
The first commands

A very first primer on the Linux command line for bioinformatics. Open your terminal and start typing the first commands! There are several pages dedicated to Bash in this website, and a set of useful resources.
What you need
- A computer with a Linux compatible terminal, this means:
- any MacBook or Mac computer with a recent version of MacOS (recommended)
- a Linux machine (Ubuntu and its variants are recommended)
- a Windows computer with Windows Subsystem for Linux installed (unsupported, sorry)
A first look at the terminal
Open the Terminal emulator (on a Mac it is called “Terminal”, on Linux it is called “Terminal” or “GNOME Terminal”). You should see something like this:
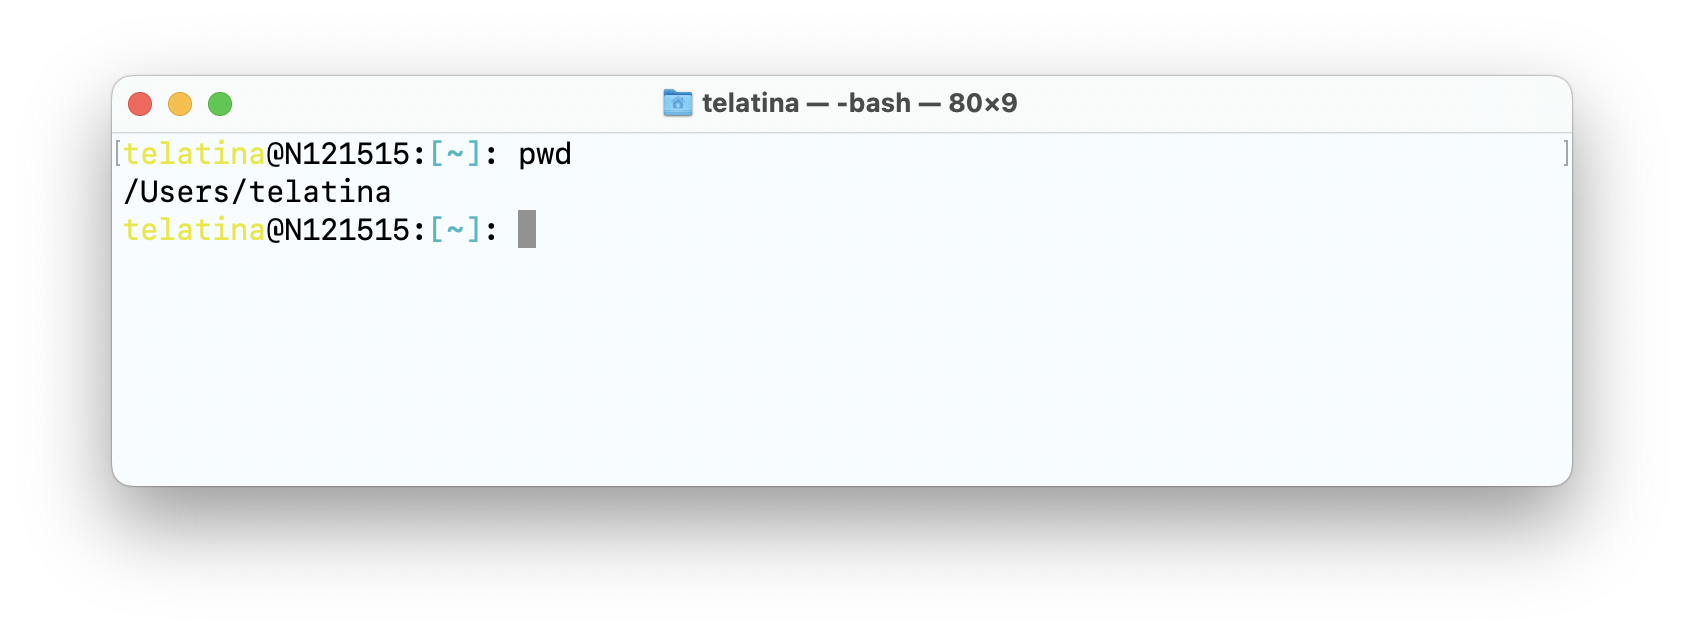
The terminal is a text-based interface to the computer. It is a program that takes commands from the keyboard and gives them to the computer’s operating system to run.
The string telatin@N121515:~$ (or similar) is called the prompt, and it’s an indication the terminal is waiting for your input.
You can type a command (like pwd in the image above) and press Enter to execute it.
If the program returns some text, it will be printed after the prompt,
and when the program finishes the execution, you
will receive a new prompt.
![]() Try yourself, type
Try yourself, type pwd and press Enter to see what it does.
Try a first command!
We used pwd (print working directory) to see where we are in the file system, it will print the directory we are in.
Now let’s try:
1

date
The first string you type after the terminaldate is the command, in this case is date. Most commands will
give us the possibility to pass some parameters, to tune their output or to feed some input.
For example, to get the current timestamp in UTC:
1

date -u
We call -u a switch (it’s either on or off).
Date has a format string that we can use to get the output formatted exactly as we need, for example try:
1

date -u +"%Y-%m-%d"
In UNIX, all commands are case sensitive, and most of the times they will be in lowercase.
Navigating the file system
it is hard to believe it, but this is the most important part of the tutorial, and one of the hardest to learn (it’s not difficult, but it takes practice)
The file system is the way the computer organizes the files and directories (folders) on the disk. You are used to see a graphical interface to navigate the file system, and it feels easier to use.
In UNIX systems, all the possible directories we have access to, are nested in a single root directory, called /.
The root directory is the top of the tree, and all the other directories are nested inside it.
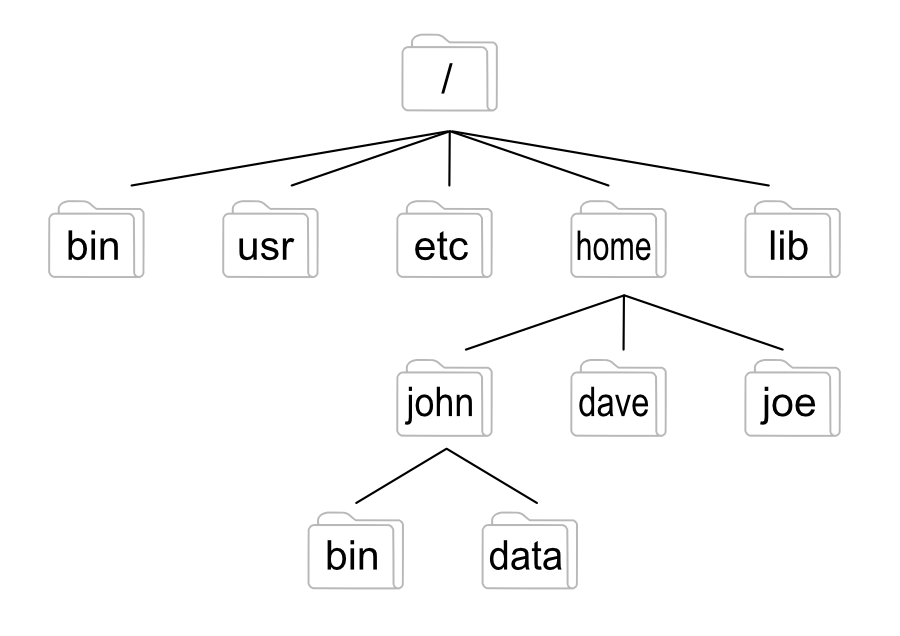
In the above scheme the directory steve is a subdirectory of admin, and admin is a subdirectory of users.
Every location (file or directory) in the file system can be described either:
- as an absolute path, that is the full path from the root directory to the location, for example
/users/admin/steve - or as a relative path, that is the path from the current directory to the location, so if we are inside jon, it would bee
../admin/steve
Let’s clarify these concepts:
- Absolute paths (almost) always start with
/, and they are the same for everyone, no matter where they are in the file system.- Each absolute paths is crafted separating with slashes the names of the directories in the path. The final trailing slash (for direcrories) is optional, but it’s wrong if the path is for a file.
-
~is a shortcut for the home directory of the current user, so if “Steve” is the active user/users/admin/stevecan be written as~. When you want to refer to your home directory, you can use~(or$HOME).~is an absolute path too. - Example:
/users/admin/steveis an absolute path for a directory, and equals to/users/admin/steve/ - Example:
/users/admin/list.txtis an absolute path for a file.
- Relative paths never start with
/, and they are different depending on where they are in the file system.- Your current directory is represented by the dot
.. - The parent directory is represented by
... - Example:
../../directory/file.txtmeans that you want to access a file inside a directory that is two levels “above” your current directory.
- Your current directory is represented by the dot
Remember that if you don’t know where you are, you can always use pwd to print the current directory (its output is an absolute path).
Some more commands
pwd
We already mentioned that pwd prints the current directory (it stands for print working directory, indeed).
cd
To change our current directory we can use the cd (change directory) command. It takes an absolute or relative path as a parameter.
1
2
3
4
5

# String after a "#" are considered comments
cd /users/admin/steve

# This command will bring us one level up
cd ..
![]() if you don’t specify a path,
if you don’t specify a path, cd will bring you to your home directory. If you want to return to your previous directory, you can use cd -.
ls
The ls command lists the contents of a directory or a set of files. It’s a powerful command, and it has many options, but we will start with the basics.
1

ls
Some parameters it can take:
- One or more files (will print them). E. g.
ls file1.txt file2.txt - One or more directories (will print their contents). E. g.
ls ~/ -
-lis a switch to print the contents in a long format, with more information. E. g.ls -l -
-his a switch to print the file sizes in a human readable format. E. g.ls -h - Multiple switches can be combined. E. g.
ls -lh
Prepare to learn more switches and uses of it as you’ll become more familiar with the command.
mkdir
To create a new directory we can use the mkdir (make directory) command. It takes a path as a parameter.
1
2
3
4
5
6
7

# Try repeating the command twice!
mkdir new_dir

ls -l

# Let's try again, will this work?
mkdir new_dir
rmdir
To remove a empty directory we can use the rmdir (remove directory) command. It takes a path as a parameter.
1

rmdir new_dir
gotcha
If we type:
1

gotcha
we will (very likely) get an error message like:
1

bash: gotcha: command not found
It’s important that we start reading the messages that the terminals shows us. In this case it means that our system
has no program (available to us) called gotcha. If we want to use it, we have to install it first.
This is a made up example, and we don’t need to install anything.
echo
The echo command prints its arguments back to the standard output. We will use this as a diagnostic tool.
1

echo "Hello world!"
It can be used to see the content of variables, for example:
1

echo "My home's path is $HOME"
![]() take note of here your home directory is located!
take note of here your home directory is located!
We used double quotes around the two messages. Try replacing the double quotes with single quotes in the last command, and see what happens.
man
UNIX comes with a massive documentation. The man command (for “manual”) will open a dedicated
documentation page for most of the commands in your system. The problem is that its content is
quite complex for beginners, but it will become incredibly useful later.
Moreover it’s a “prototype” for an interactive program, the first we will use, and its behavior
is mimicked by other tools, most notably less.
Let’s try opening the manual for ls:
1

man ls
Now you see a full page text, and you didn’t get your prompt back: this is because you are inside an interactive program. You can use the arrows to scroll and:
-
gto go to the top of the page -
Gto go to the bottom of the page -
/to start searching for a string (that you have to type followed byEnter) -
nto go to the next occurrence of the string you are searching for -
Nto go to the previous occurrence of the string you are searching for -
qto quit the program (you will get your prompt back)
![]() Can you try - using man - to find out how to sort the output of
Can you try - using man - to find out how to sort the output of ls by modification date or by size?
(yes, you can Google if man doesn’t help you)
Downloading our toy files
The goal of this section is to download an archive with some toy files to use in the next sections.
There are two main tools to download files from the terminal: wget and curl. We will cover both
as sometimes only one is available.
![]() Go to your home directory before following this section, with
Go to your home directory before following this section, with cd ~.
wget
The wget command is a tool to download files from the web. It’s a very powerful tool, but we will
use it in a very simple way.
1

wget "https://github.com/telatin/learn_bash/archive/refs/tags/2020.tar.gz"
This will download the archive 2020.tar.gz and save it in the current directory.
curl
The curl command is a tool to download files from the web. While wget will save the file with its
name in the current directory, the default behaviour of curl is to print the content of the file (which
we don’t want), so we need to add the -o output-destination parameter. In addition we will also need
to add the -L switch to follow redirects, or our file will not be downloaded.
1

curl -L -o 2022.tar.gz "https://github.com/telatin/learn_bash/archive/refs/tags/2022.tar.gz"
![]() it’s good practice, when pasting URLs from the web, to enclose them in quotes to avoid problems: if they contains
characters like
it’s good practice, when pasting URLs from the web, to enclose them in quotes to avoid problems: if they contains
characters like & or ? they will be interpreted by the shell and the command will fail.
tar: extracting the archive
We downloaded an archive in the .tar.gz format. This is a compressed archive, and it’s very popular in UNIX systems. To decompress it:
1
2

# DO NOT COPY AND PASTE THIS!
tar -xzf 20[TAB]
![]() Here we introduce a very important concept: the tab completion. We typed
Here we introduce a very important concept: the tab completion. We typed tar -xzf 20 and then pressed the TAB key,
and the terminal automatically completed the command with the name of the file we downloaded.
It’s not only very convenient to use, it’s mandatory to use it as it provides a feedback that we are effectively typing
the correct filename. If tab completion “doesn’t work” it means that you started typing the filename wrong.
After typing tab we should get the full command completed:
1

tar -xzf 2022.tar.gz
Where we combined some swiches:
-
-xswitch to extract the archive, - the
-zswitch to decompress it, - and the
-fparameter to specify the filename (immediately after).
Try typing ls: can you see that a new directory was created?
To see it’s content you can type:
1
2

# Remember to use tab completion!
ls -l learn_bash-2022
It’s output will be something like:
1
2
3
4
5
6
7
8

total 16
-rw-r--r--   1 telatin  bioinfo  6660 26 Oct 12:30 README.md
drwxr-xr-x   6 telatin  bioinfo   192 26 Oct 12:30 _readme_maker
drwxr-xr-x   5 telatin  bioinfo   160 26 Oct 12:30 archives
drwxr-xr-x  18 telatin  bioinfo   576 26 Oct 12:30 files
drwxr-xr-x   7 telatin  bioinfo   224 26 Oct 12:30 misc
drwxr-xr-x  21 telatin  bioinfo   672 26 Oct 12:30 phage
drwxr-xr-x  13 telatin  bioinfo   416 26 Oct 12:30 scripts
The first column lists the permissions of the file and its type: if the first char is d it’s a directory, if it’s - it’s a file,
if it’s l it’s a link (“shortcut” as called in Windows).
Two columns specify the owner and the group of the file. We just created them expanding an archive, so these files are owned by us.
We have a column specifying the size of the file, and the last column is the name of the file.
![]() To make our tutorials easier, we will now rename the directory to
To make our tutorials easier, we will now rename the directory to learn_bash:
1

mv ~/learn_bash-2022 ~/learn_bash
Installing HomeBrew in MacOS
This is a MacOS specific section. If you are using Linux, you can skip it.
MacOS and Linux have a terminal, but the one present in MacOS by default comes from the BSD family of UNIX systems, and it’s not the same as the one in Linux. Some commands are different, and some are missing.
To be able to install Linux-like commands on MacOS, you can use Homebrew, which can be installed with the following command (will require you to enter your password):
1

/bin/bash -c "$(curl -fsSL https://raw.githubusercontent.com/Homebrew/install/HEAD/install.sh)"
Check if it’s installed with:
1

brew --version
Once Homebrew is installed, you can install the GNU coreutils with:
1

brew install coreutils
HomeBrew is a package manager, meaning we can install (and from now on withouth any more password prompt) a lot of useful UNIX tools.