Install Miniconda

The problem and its solution
A typical bioinformatics workflow involves dozens of different tools, sometimes each requiring a broad range of libraries and other dependencies. Installing all of them is a tedious task sometimes, an impossible task when different packages require different versions of the same tool.
There are two main solutions to the problem: one is to rely on containers (which resolve the problem of conflicting packages, but does not necessarily simplify the installation of the packages) or package managers.
Miniconda: a popular solution
Miniconda is a package manager that was developed to simplify the installation of Python tools and the creation of isolated environments (to allow, for example, the insulation of conflicting packages).
Miniconda quickly became a fantastic solution to the problem providing:
- a package manager that runs in the user space (not requiring
sudoprivilege) - an easy way to add new packages to the repository (in fact, repositories)
Installing conda
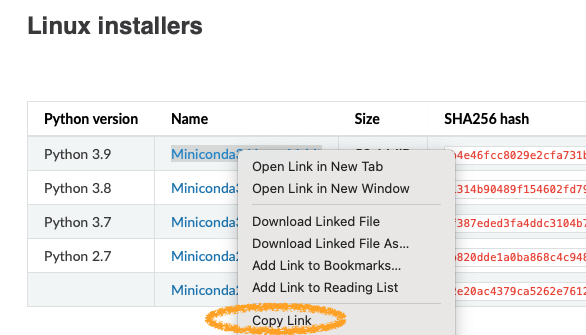
The latest version is available from the offical website. There are installer for Linux, macOS and Linux, and based on different versions of Python: copy the link for your platform and the version desired (avoid Python 2.7 and 32-bit versions):

Here a typical workflow (changing the URL accordingly), that will install
Miniconda in your home directory (~/miniconda3).
1
2

wget -O install.sh "https://repo.anaconda.com/miniconda/Miniconda3-latest-Linux-x86_64.sh"
bash install.sh
This will start an interactive process that will ask some questions (to accept the license and to start the initializer).
When the process is finished you’ll be asked to restart your shell
(i. e. to log out and login again,
or simply try typing source ~/.bashrc on most systems)
Repositories
Conda allows to install packages from a default channel (mainly containing python modules), but also supports third party channels. There are three channels that can be of particular interest in (bio)data science:
-
biocondacontains bioinformatics programs (and bioinformatics R libraries) -
conda-forgecontains updated versions of commonly used command-line utilities -
rspecializes on R libraries
For example, to check if samtools is available in bioonda, and which versions:
1

conda search -c bioconda samtools
To install it you can either accept the last compatible version:
1

conda search -c bioconda samtools
or specify the version you require:
1

conda search -c bioconda samtools=1.10
To install a package, simply replace search with install.
If you also add -y you will not be prompted and will try to install directly.
1

conda install -y -c bioconda vsearch
We can add some channels to a configuration file so that conda always checks them
when searching. This will make some searches slower so I generally only add conda-forge,
but adding also bioconda can be appropriate. Avoid adding r: it’s massive and
rarely used in bioinformatics (most biological R packages are available in bioconda).
To add some channels in your configuration file, create (or edit) the ~/.condarc file as
follows:
1
2
3
4

channels:
  - defaults
  - conda-forge
  - bioconda
Creating and using environments
Conda simplifies installing package, but a problem remains: conflicting versions. You may want to use samtools 1.10, for example, but another tool installed an older version because it’s not yet ready to support a more recent one.
Conda allows to create environments, that are isolated rooms where you can install packages independently from other rooms.
Create a new environment
We need to choose a unique name for our new environment, in this example myenv1 (usually it’s the name of a tool (like qiime2-2020.1) or a task (like denovo):
1

conda create -n myenv1
Activate the environment
To use an environment we need first to activate it:
1

conda activate myenv1
When the environment is active, you will no longer be able to access the packages you installed in the base environment, and if you install a package now it will belong to the active environment.
1

conda install -c bioconda vsearch=2.17
Deactivate the environment
To return to the previous environment:
1

conda deactivate
List your environments
To get a list of the environments in your system:
1

conda info --envs
Delete an environment
To be used with care:
1

conda remove -n ENVIRONMENT_NAME --all
Using mamba for faster installations
![]() you can now update your conda to become faster as mamba
see how.
you can now update your conda to become faster as mamba
see how.
Sometimes we require a lot of packages to be installed and this will trigger a long process called “solving the environment”. There is a drop-in replacement for Conda called mamba, that you can install from conda-forge:
1

conda install -y -c conda-forge mamba
Then just replace “conda” with “mamba” to use it, for example:
1

mamba search -c bioconda seqfu
and to install (for example):
1

mamba install -c bioconda seqfu
See also: