Scaffolding with ScaMPI
User Manual
ScaMPI - 2010, CRIBI - University of Padua
http://genomics.cribi.unipd.it/scampi/
Andrea Telatin - andrea.telatin@cribi.unipd.it
Version 1.16 - Last revision 29/08/2013
Table of Contents
Preliminary operations and concepts
Nomenclature used in the manual
Other preliminary operations for the “contigs.fa” file
Alignments of paired reads against contigs
Automatic scaffolding from seed
Validating scaffolds with BAC ends
Convert chromatograms to FASTA files
Appendix II – Paired alignments
Aligning and pairing SOLiD Mate Paired reads
Appendix III – Contig correctness check
Appendix IV - Telomere identification
De novo identification of the repeat
Isolation of motif-containing MP reads
Extraction of putative peri-telomeric regions
Alignments of MP/PE: format and pairing
Appendix VII - Supplementary tools
Graphical plot of scaffolds (GraphViz)
ScaMPI is a suite of tools for genome scaffolding providing a visual interface. ScaMPI allows to:
ScaMPI is modular meaning that while it provides all the tools needed for the above operations, the user can:
ScaMPI requires a little knowledge of Linux to be installed, while the aspects that could be relevant for the non bioinformatics aware collaborators are available to a web based interface that allows them to:
These two features are useful to make data available for research before the final assembly is released. Moreover, being web based, once that the program is installed in a single PC, the interface is available without installation.
The official website for ScaMPI is http://genomics.cribi.unipd.it/scampi/, that features a blog that is updated with tutorials, new tools and packages.
We recommend to check the online blog for minor updates.
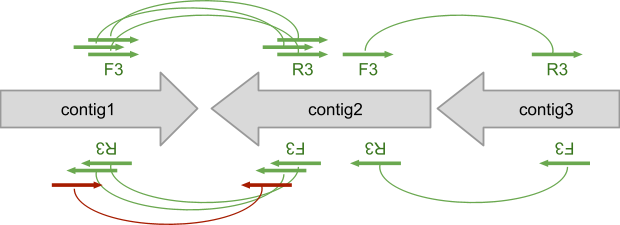
Before starting let’s consider a simple example of three contigs connected by SOLiD mate paired reads. We will refer to connection between contigs using the 3’/5’ nomenclature of nucleic acids but omitting the “prime”, thus the link between contig1 and contig2 is “3-3” while connection between contig2 and contig3 is “5-3”.
Figure 1 – Mate Paired reads aligned against reference contigs are used to produce “arcs”, later exploited for scaffolding.
We call “arcs” the connections between contigs. Each arc has:
For ScaMPI to work you’ll need a *AMP machine (Apache/MySQL/PHP) with Perl installed. A 64-bit Linux distribution with MySQL client/server available is the ideal and the only actively supported platform, although with minimum efforts it is possible to run both the scripts and the web interface under OS X and Windows. The whole ScaMPI pipeline has been tested on Ubuntu 8.04 LTS, 12.04 LTS, Linux Mint 12 and CentOS 6.
As a proof of concept the whole scaffolding process, and the web interface, has been tested on a Raspberry Pi (ARM - 512 Mb RAM, LAMP installed), and worked fine. Most browsers will work fine with the interface, although Google Chrome™ is recommended.
RAM is an issue when aligning, and the size required increases with the size of the reference (i.e. sum of contigs). Nevertheless, the alignment step can be performed on a separate server.
ScaMPI core scripts . . . . . . . . . . . . Perl and MySQL (tested on GNU/Linux)
ScaMPI web gui . . . . . . . . . . . . . . . . . Apache (or other web server), MySQL, PHP
PASS aligner . . . . . . . . . . . . . . . . . . . . 64-bit GNU/Linux
It is handy to create a directory with symbolic links to the following files (or with the following files themselves):
contigs.fasta . . . . . . . . . . . . Set of contigs to be scaffolded (multifasta)
lib1_F3.csfastq . . . . . . . . . . First mate/pair for “library1”
lib1_R3.csfastq . . . . . . . . . . Second mate/pair for “library1”
… Add as many libraries is possible
SOLiD libraries are expected to be in “csfastq” format (you can combine the .csfasta and the .qual files with the csfasta_to_fastq program in the “tools” directory).
Automatic database creation - The scampi_project.pl script allows for automatic creation of a database and configuration file for the ScaMPI program and web interface.
If launched with the -c switch will create both the database and the configuration file, otherwise will produce the configuration file alone assuming that the database is already present.
+---------------------------------------------------------------------+
| ScaMPI TOOLS |
| Create project files |
+---------------------------------------------------------------------+
Will save a 'db_data.php' file to be used in other scripts.
-p Project name (short string like 'wheat')
-h MySQL host [localhost]
-u Desired MySQL user name [scampi]
-p Desired MySQL password [magic]
-d Desired MySQL database [equal to -p]
-o Output directory [.]
-c Create database and user (requires administrative password)
The scampi_testconfig.pl script can be used to test the configuration file and check that the connection to the database works.
Manual database preparation – Create a MySQL database with your project’s name. It could be a good idea to create a dedicate user with privileges on that database. We will refer to these data as dbuser, dbpwd and dbname.
Example:
mysql -h host -u root -p password
inside the MySQL shell
> CREATE DATABASE dbname;
> CREATE USER 'dbuser'@'localhost' IDENTIFIED BY 'dbpwd';
> GRANT ALL ON dbname.* TO 'dbuser'@'localhost';
Contigs assembled using non paired reads could lead to misassemblies that paired reads can solve. Before starting the scaffolding step it’s important to have the most robust contigs dataset as possible.
See Appendix III to see how to use the provided correctness check module.
ScaMPI retrieves information about contigs (name, size, coverage) from a table of the database that can be created starting from the contigs file.
The program contigs_to_db.pl requires a multifasta file containing contigs and will extract contig names and length from the same. If the header has the coverage information (like some assembler does) it can be used to save this important feature in the table. The script produce as output a SQL script to create a “contigs” table.
A basic usage of the program:
contigs_to_db.pl contigs.fasta > contigs_table.sql
mysql -h host -u dbuser -p dbpwd -D dbname < contigs_table.sql
If your contigs headers contains information about average coverage, this can be (and should be) saved to the database.
If the header is in the Abyss format it will look like:
>contig1|size1517|read89|cov5.00|seed:1
You can use the -covstring "cov#\|" switch to extract the information. The -covstring parameter expects a pattern where the # character is replaced with numbers and dots. This parameter can be used with any kind of assembler that prints directly the coverage in contigs headers, it’s important to escape slashes and pipes. For Velvet you can use a -covstring “cov_#”;
If you use Newbler you’ll have the number of reads used; the script provides the -newbler AverageReadLength parameter to estimate the average coverage.
With Newbler contigs:
contigs_to_db.pl contigs.fasta -newbler 390 > contigs.sql
The “contigs.fa” file is a pivotal resource in ScaMPI and can be used not only to align mate paired information but also for other optional steps. In particular:
See Appendix V.
SOLiD Mate Paired are better aligned with the PASS program, that is supplied with ScaMPI. A main advantage of PASS is a robust implementation of color space reads, using SOLiD mate pairs, and the platform independent output produced with the pairing program.
If using PASS v.1.64 align separately the FOR and REV pairs. A PASS release tested to be used with ScaMPI is stored in the tools directory (compiled for Linux 64bit). The binary is called pass.
Note that any aligner can be used for ScaMPI, as long as the two reads set (For and Rev) are aligned independently. The output has to be converted from SAM to GFF with the included sam2gff utility.
For SOLiD reads use the following command, for Illumina just replace “-csfastq” with “-fastq” followed by the FASTQ file of the reads:
pass -csfastq lib1_F3.csfastq -d contigs.fasta \
-cpu n -gff -fid 90 -uniq > lib1_F3.gff 2> log_lib1_F3
The pairing process checks the alignment for both mates (or pairs) and classify them into classes. We’ll use the pass_pair program supplied in the “tools” directory.
For scaffolding purposes when one mate is uniquely aligned against a contig and the other in another contig (uniquely again), this is classified as UNIQUE_PAIR_OUT (provided that the distance between the two is compatible with insert size).
When both mates align uniquely within the same contig with the proper orientation and distance they are classified as UNIQUE_PAIR. Please, create a new directory to store output files (in the example is outputdir/).
Reads directionality – SOLiD Mate Paired reads (tagged as _F3 and _R3) have the same direction (F3→, R3→) while paired-ends (for example Illumina) reads have opposite directions and are sometimes tagged as /1 and /2 (1→,←2). The pass_pair program needs to know exactly this to sort out categories: -pe_type 0 specifies the SOLiD type, -lib_type 0 for SOLiD direct libraries. For further details and for other seqeuencing platforms refer to PASS manual available at http://pass.cribi.unipd.it/.
Library insert size – pass_pair requires the user to provide a range for insert size plus a maximum size. If you have a library spanning 500-1000 bp you could provide 400 1100 1500 as parameters. The third is the maximum tolerated distance (that can be ignored for ScaMPI and set to maximum+1). Please, consider that the log file of pass_pair provided a detailed distribution of insert sizes calculated on large contigs. A preliminary pairing with “relaxed” parameters could be used to fine tune this important setting.
For SOLiD Mate Paired reads:
pass_pair -gff1 lib1_F3.gff -gff2 lib1_R3.gff -ref contigs.fa \
-range 400 1200 1500 -o outputdir/ -log outputdir/log.txt
For Illumina Paired Ends reads:
pass_pair -gff1 lib1_F3.gff -gff2 lib1_R3.gff -ref contigs.fa \
-range 500 1000 1500 -tags '/1' '/2' -o outputdir/ -log outputdir/log.txt
In the output directory the program will save many files. We are going to use:
In both cases they represent unique alignments with proper mutual orientation and insert size. The format is a GFF file, exactly as the input alignment files, with the only difference that each alignment line is followed by the alignment of the other mate.
The second pivotal table is the one for connections between contigs. A single table can store different libraries, as long as each library has its unique identifier.
mates_to_arcs.pl parses the (gff) UNIQUE_PAIR_OUT file produced by pass_pair and produces a tabular report of arcs. The list of parameters, that can invoked launching the program alone or with the -h switch, is shown below:
___ __ __ ___ ___
/ __| __ __ _| \/ | _ \_ _|
\__ \/ _/ _` | |\/| | _/| |
|___/\__\__,_|_| |_|_| |___|
-------------------------------------------------------------------------------
MATE PAIRS (UNIQUE_PAIR_OUT) to ARCS CRIBI Biotech Center 2012
-------------------------------------------------------------------------------
This program parses the UNIQUE_PAIR_OUT output of 'pass_pair' to create 'arcs'
for scaffolding. Default output is a tabular file as described in the manual.
-i or -f Input file (UNIQUE_PAIR_OUT from 'pass_pair' (GFF)
-m, --minarcs Minimum number of mates to create a connection [3]
-c, --concordance Minimum % of concordant mates per connection [0]
-l Maximum length of the connection [off]
-t, --test Stop after parsing this number of lines [off]
-d, --debug Print a debug column [off]
To print output in SQL format:
-tab MySQL table name (eg: 'arcs')
-lib Library id for the MySQL database (eg: '1')
-head Print also a create table statement
-h, --help Prints this message
Example:
scampi_mates_to_arcs.pl -i UNIQUE_PAIR_OUT -c 80 -m 10 > library1.arcs
-------------------------------------------------------------------------------
This program clusters alignments sharing the same origin and destination contig, and will print the most abundant direction (concordance percentage). With the -c and -m switches we can impose to print only arcs with a minimum concordance percentage and number of mates composing it. The default output format is tabular:
Ctg1 (from) | Ctg2 (to) | Ctg1_end | Ctg2_end | Distance | Concord. | #Mates |
contig040 | contig057 | 3 | 5 | 900 | 100 | 1294 |
contig060 | contig079 | 5 | 5 | 252 | 99 | 15 |
The scampi_arcs2sql.pl tool convert this tabular output into a SQL statement to create and populate the MySQL table. The latest version of mates_to_arcs.pl allows to print directly in SQL format, passing the -tab and -lib parameters that specify, respectively, the name of the table (e.g. arcs) and the name of the library (e.g. 1). The former should be arcs if working with just a dataset, the latter an integer either progressive or similar to the insert size.
The ScaMPI package contains a “web” directory that has to be accessible via web, either configuring the web server or just placing it inside the www documents directory (e.g. in /var/www/ for defaults Apache’s installations).
In the /web/inc subdirectory the db_con.php file has to be changed inserting the MySQL credentials.
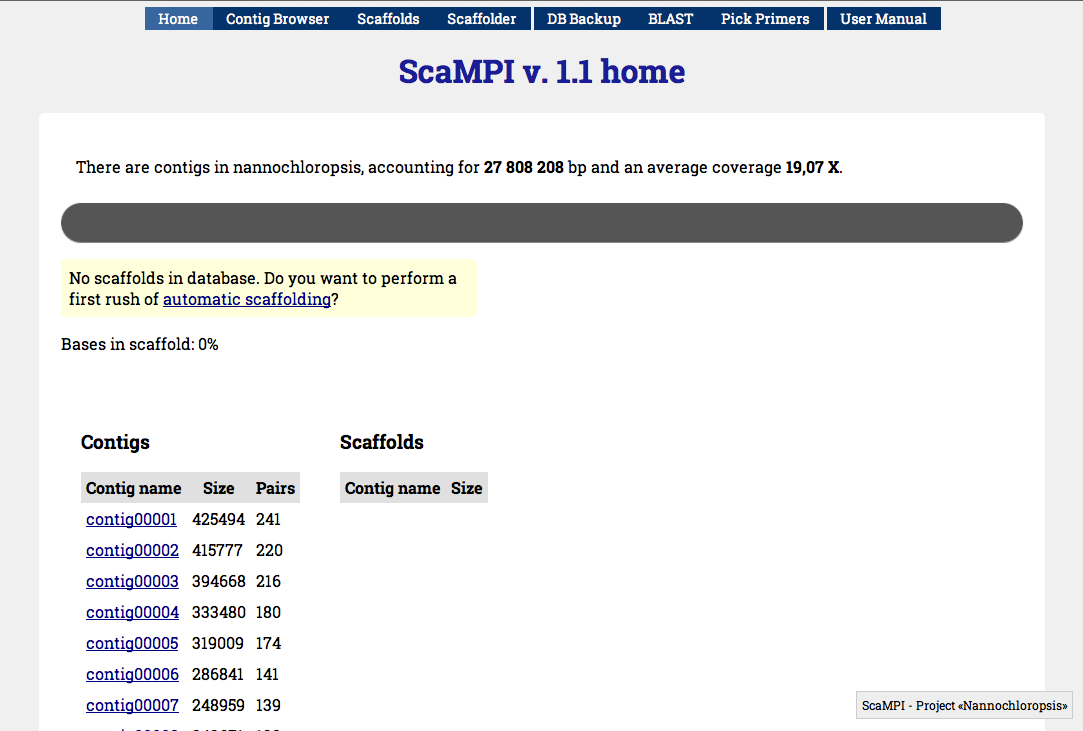
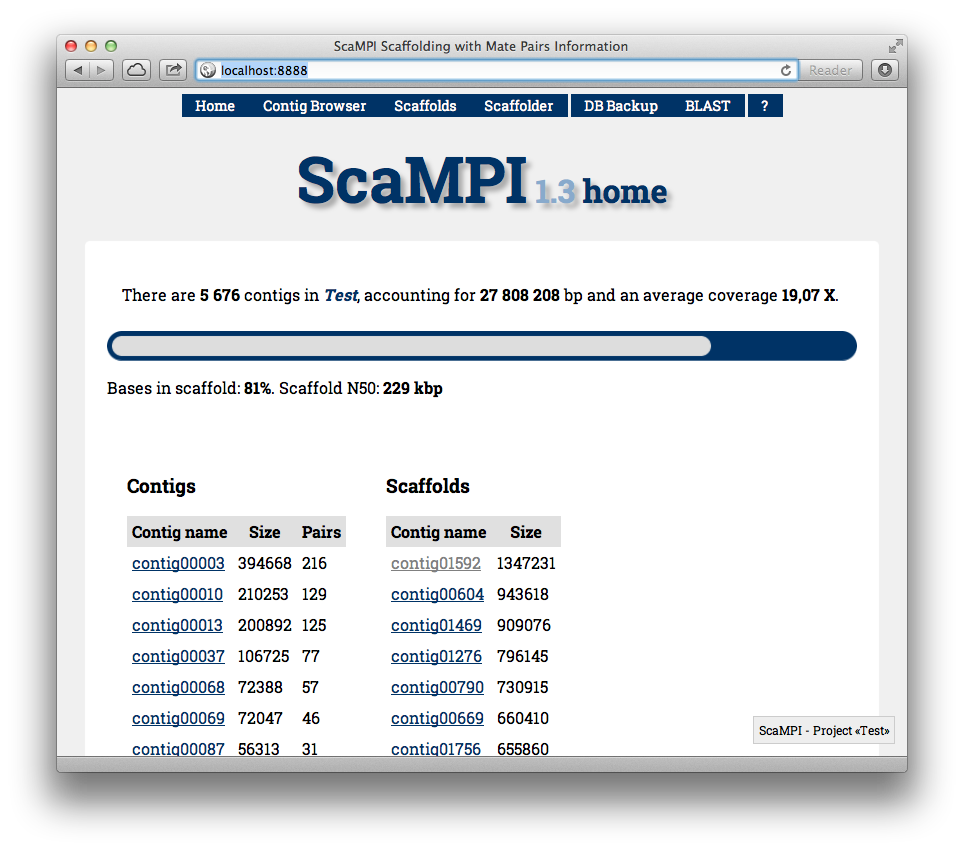
Once that the db_con.php file is updated you can browse to the /web directory using a web browser. If you placed the whole scampi directory in the document root directory (e.g. /var/www/) you can go to http://localhost/scampi/web/ to open the web interface. You’ll see something like Figure 2. The top bar contains shortcuts for different sections, while the main page resumes the current scaffolding status: the progress bar will indicate 0% (we will change things in a while), and you’ll see a list of the largest contigs not in scaffold.
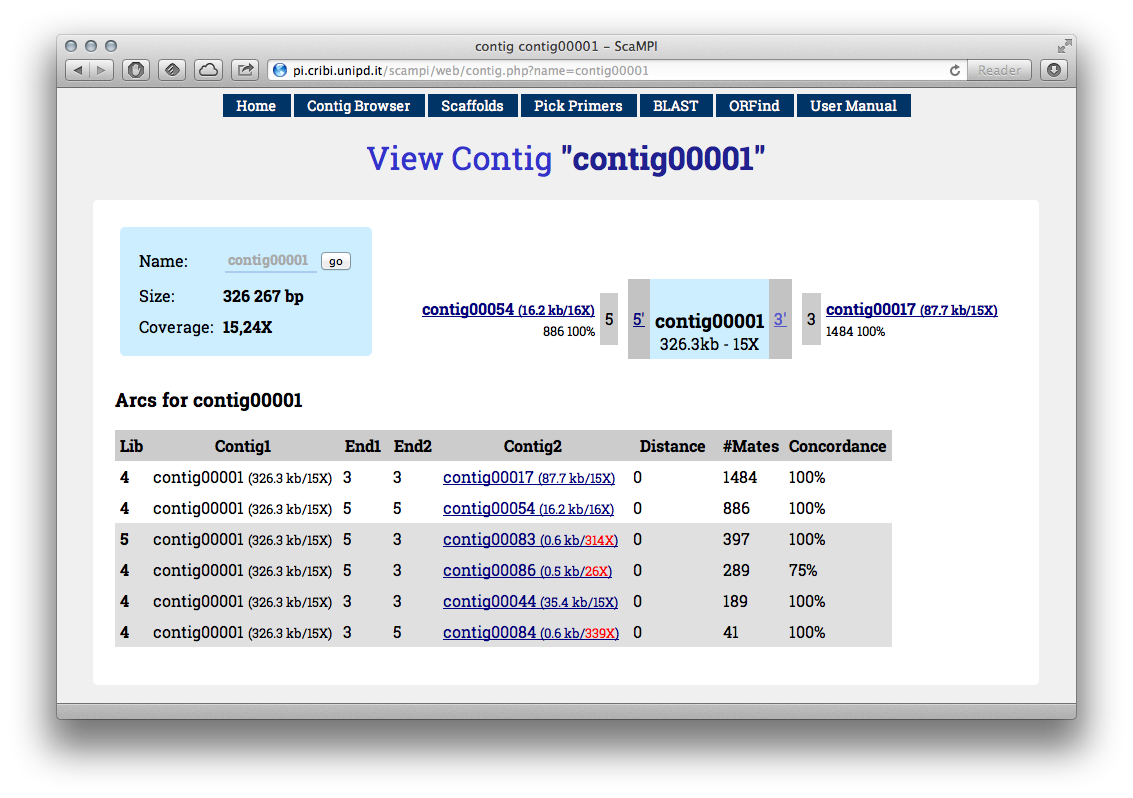
Clicking into a contig name will open the page depicting its connections (see Figure 3). This web interface is already functional to perform some manual scaffolding. This can be useful to understand your genomes’ peculiar problematic regions, as well as the reasonable coverage limits to avoid entering in repetitive regions.
Figure 2 - Default view of the ScaMPI web interface after populating the database with contigs and arcs informations. If accessed for the very first time will propose automatic scaffolding.
Figure 3 - An example of “contig” view. You can see a list of connections either from 3’ or 5’ at the bottom, and the most abundant depicted in the central scheme. If clicking the “Scaffolder” button from this page, will perform scaffolding from selected contig as seed.
From each contig page (see Figure 3) you can start the scaffolding from seed clicking the “Scaffolder” link in the top bar. This can be a first step to work with your data. You can inspect what causes the scaffolding to end by clicking to the final contigs of each automatic scaffold and seeing if there is a lack of arcs (low MP coverage) or an excess of arcs (repetitive/complex region).
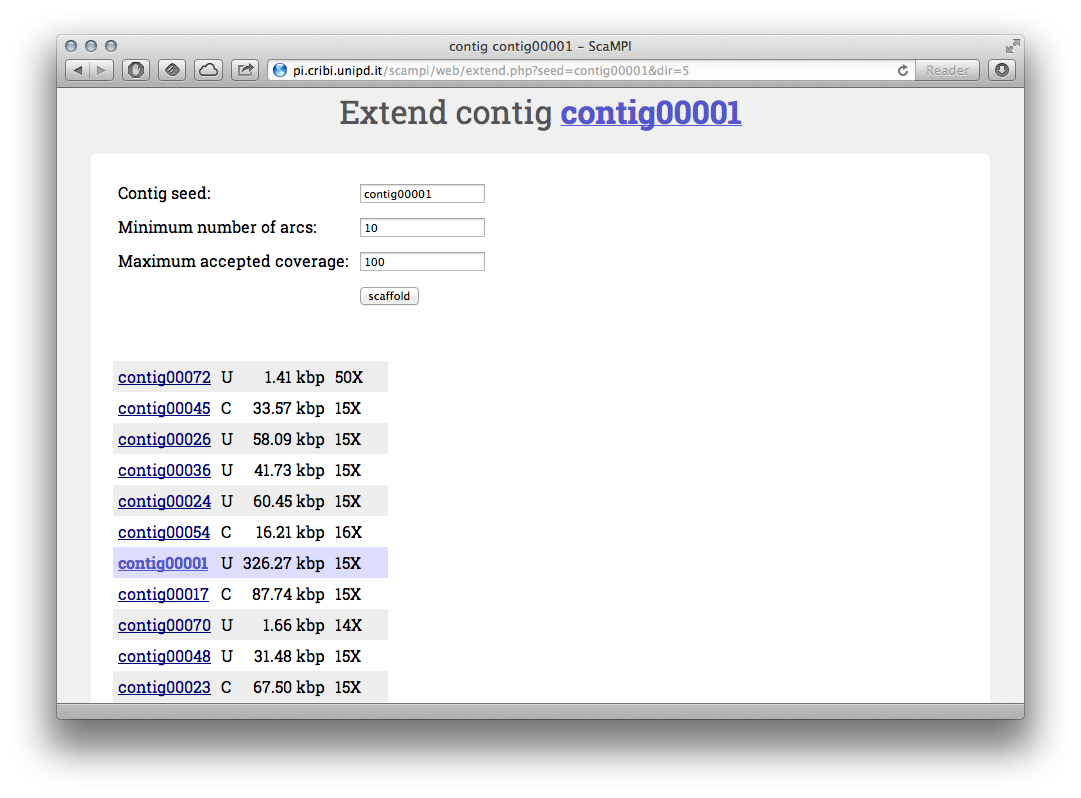
Figure 4 - Scaffolding from “contig00001”. You can fine-tune the minimum number of connections and maximum coverage.
The script used by the interface to perform the scaffolding is the “divorce.pl” module under the /web/inc directory.
The first step to perform the automatic scaffolding is to invoke the multi-scampi.pl script (again in the /web/inc directory).
Although for this task is usually performed via the command line, there is a button labeled “Scaffolder” in the top bar of the web interface that access the very same tool. If you enter the web interface for the first time, a link in the home page will suggest you to try the automatic scaffolder (that can be tested without altering the database, first).
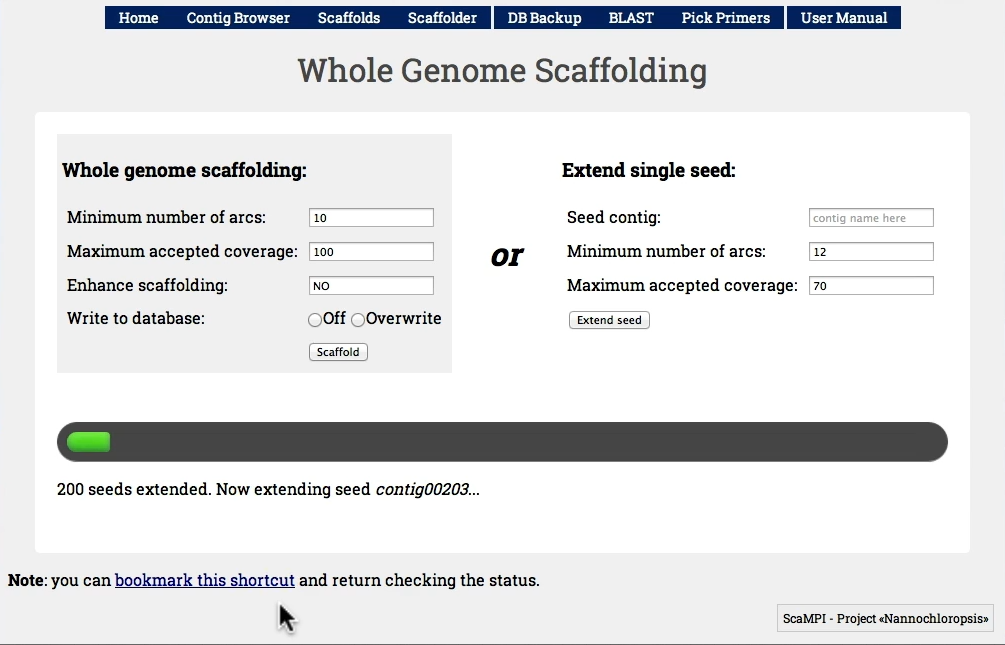
Invoking “Scaffolder” from the home page allows to test ScaMPI algorithm on whole genome. This can be fine-tuned later, but it’s usually a good starting point.
Select a minimum number of arcs and the maximum coverage then click “Scaffold” button. Note that the process can take several minutes, but works on background so that you can even close the browser. There is a “shortcut link” on the bottom that can be used to return checking the scaffolding status later. Our testset (N. gaditana, 30 Mb) took 4 minutes on a Pentium Core2 (Q9300) with 8Gb RAM.
Figure 5 - The “Scaffolder” interface, if invoked from the homepage, is set to perform whole genome scaffolding. Selecting “off” in “Write to database” we simulate the process, otherwise scaffolds will be written after deleting previous entries.
You’ll notice the process is finished - hopefully - by seeing that the progress bar in the home page, that counts how many bases are included in scaffolds (Figure 6).
Figure 6 - ScaMPI’s home page now provides link to scaffolds and gives an idea of the amount of bases in scaffold thanks to the green progress bar.
The web interface is actually a front end for the “multi-scampi.pl” script in the /web/inc directory.
Here how it works:
___ __ __ ___ ____
/ __| __ __ _| \/ | _ \_ _|
\__ \/ _/ _` | |\/| | _/| |
|___/\__\__,_|_| |_|_| |___|
-------------------------------------------------------------------------------
SCAFFOLDING FROM SEEDS CRIBI Biotech Center 2010
-------------------------------------------------------------------------------
-db FILE Configuration file for MySQL connection [./db_con.php]
-div FILE Scampi core module [./divorce.pl]
-cov INT Maximum contig coverage [80]
-arc INT Minimum amount of mates per arc [12]
-con INT Minimum percentage of concordance [90]
-fil FILE Scampi optional module [], optional
-write Save scaffold in DB
-rewrite Erase all previous info and save scaffold in DB
The script can be invoked without parameters as will use the db_con.php file inside its directory for database connection and other default settings, but for the first trial we recommend to use the -fil NO switch, that avoid using an optional module for adding smaller contigs skipped by first scaffolding.
Moreover in order to save to database the scaffold you have to use the -rewrite switch (-write if you want not to clear previous scaffolds, that is not recommended in general).
After this first step you’ll find that the progress bar of the main page will show the amount of bases included in scaffolds, and the list of scaffold will no longer be empty.
A simple example of multi-scampi.pl execution (from a very limited hardware as a Raspberry Pi!) is shown in the video: https://vimeo.com/67809642.
When possible, it is recommended to further experimental data to validate genomic scaffolds. A common procedure involves the sequencing of the two ends of large insert libraries as BAC ends or Fosmid ends.
We developed and tested a simple pipeline to simplify the analysis of the results.
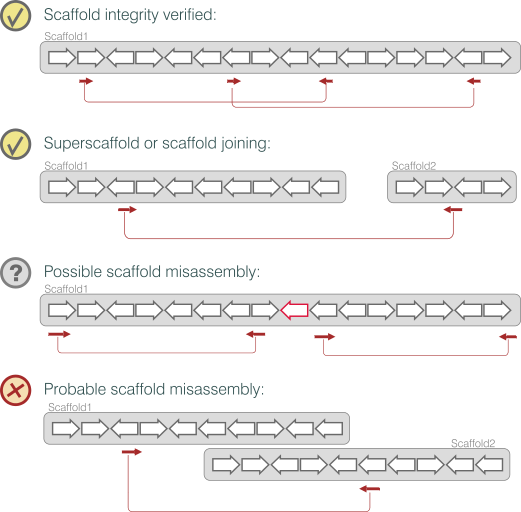
It should be noted that a BAC ends pair properly aligned verifies the portion of scaffold physically covered by it.
Figure 7 - Schematic representation of BAC ends validation cases
Other outcomes of the alignment, as depicted above, will give hints of:
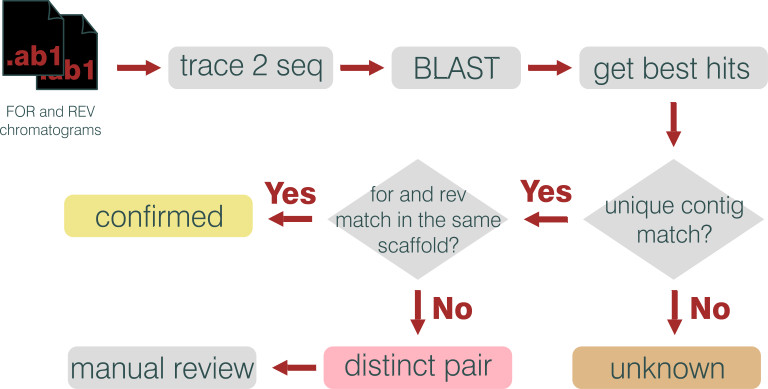
If no other tools are available, we provide a simple Perl script (abi2fa.pl) that performs this step using ABI.pm module (http://search.cpan.org/~malay/ABI-1.0/ABI.pm).
Figure 8 - BAC ends pipeline workflow.
The align_bacends.pl script requires BLAST binaries (blastall) and a formatted database of scaffolds.
This is the a typical usage:
align_bacends.pl fa FOR REV scaffolds.fna
The four mandatory parameters are:
1) the extension of fasta files with BAC ends sequences (one per file). You have to launch the program from the directory containing them;
2-3) The string to classify “For” and “Rev” sequences, that has to be present in the file name;
4) The BLAST database (scaffolds).
The output is a report of validated regions, a list of possible scaffold to be joined and a list of critical regions that deserve further investigations.
Finally a report of how many scaffolds (and Mbp) are confirmed. We report a subset of the output here:
Tag Starting Scaffold Ending Scaffold BACs Notes
[?] contig01469 + - contig00608 1 .
[?] Scaffoldcontig00345 + + contig00225 1 .
[?] Scaffoldcontig00147 - + Scaffoldcontig00282 2 .
[?] contig00323 - + Scaffoldcontig01068 1 .
[?] contig00337 + + contig00363 1 .
[?] contig00273 + + contig00493 3 .
[?] contig01048 + - contig02066 4 .
[?] contig00466 - + contig02211 1 .
Each confirmed sequence has a header line plus a line for each BAC pair confirming it. A couple of examples:
contig00022 568905 14 From: 96437 To: 552573 131694
seq_P2_Q3_-B04.fa 138655 from:478917 - to:340262 +
seq_P1_Q1_-G02.fa 184511 from:549922 - to:365411 +
seq_P1_Q2_-F01.fa 153533 from:325597 + to:479130 -
seq_P2_Q4_-D11.fa 230809 from:281509 + to:512318 -
seq_P1_Q4_-H01.fa 71293 from:96437 + to:167730 -
…
Scaffoldcontig00282 19397 2 From: 7884 To: 15535 844.5
seq_P2_Q3_-H06.fa 658 from:8542 + to:7884 -
seq_P1_Q2_-D07.fa 1031 from:14504 - to:15535 +
FOR files 665 (FOR)
REV files 665 (REV)
Other (skip) 1
Paired 665
REV not f. 0
Failed seqs. 27
NoMatch 119
Confirmed 278
Bp Covered 11527770 bp
Connections 203
For each scaffold the red bar represents the scaffold itself, having the shaded vertical lines representing the gap between a contig and the following one.
The red arcs represent BAC ends. The green line is the covered region in terms of contigs.
Several source of information, including BAC ends as described in previous chapter or telomeric extremities marked, can be used to improve the scaffolding.
If two scaffolds are supposed to be connected you can find the facing contigs and try to see if they are connected via MP through some other contigs.
The contig_from_to.pl scripts will create, if possible, a scaffold joining the two contigs.
join_scaffolds.pl is a script to create a super scaffolds. This is the syntax:
join_scaffolds.pl newname scaffold1C scaffold2U scaffold3C..
Where “newname” is the name of the superscaffold, followed by a list of scaffolds names with their orientation expressed as “U” for “uncomplemented” or “C” for complemented, if it should be reversed complemented.
Core Scripts
scampi_project.pl | Create a new database with a dedicated MySQL user. |
scampi_testconfig.pl | Test a database connection using a configuration file created by scampi_project.pl |
contig_to_db.pl | Parses a multifasta file with contig and prints a SQL script to create and populate the contigs table. The table will lack coverage information if not available in the sequence headers. |
scampi_mates_to_arcs.pl | Reads paired alignments to produce arcs (connections) between contigs. |
scampi_arcs2sql.pl | Loads arcs file made by reads_to_arcs.pl into a SQL table. |
divorce.pl; divorce-enhanced.pl | Scripts for scaffolding from single seed. Used by the interface and by multi-scampi.pl core module. |
multi-scampi.pl | (in /web/inc) performs scaffolding for the whole genome, and eventually updates the database saving scaffolds produced. |
Other tools | |
csfasta_to_fastq | Combine reads and qualities in a single FASTQ file |
pass | Alignment tool (Campagna et al. 2007) |
pass_pair | Combine the alignments of the two pairs/mates |
pair_mates.pl | Read the two fasta/fastq files of mate reads, and prints only the reads present in both. Useful for sequencing machines that gives as output also orphan reads. |
pairin_simplifier.pl | Converts UNIQUE_PAIR from pass_pair in a sorted file |
consistency.pl | Breaks apart possible misassemblies |
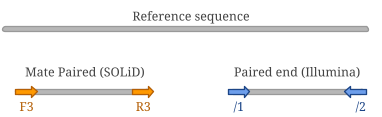
A pivotal step in scaffolding with paired-ends / mate-paired reads is to properly join the two sequences originated by a single DNA fragment (Figure A2.1). We refer to this step as “pairing”. There are two main approaches to perform pairing:
For SOLiD Mate Paired reads we recommend the first strategy, using PASS as aligner and the pairing tool it provides to join the two alignments.
For base-space encoded reads (Illumina, Ion Torrent etc) both strategies can be used; if you choose the latter, ScaMPI has been tested with Bowtie2.
Figure A2.1 - When aligning mate paired reads against a reference, they have the same orientation (i.e. strand). It’s important to remember tha F3 mate is always upstream, while R3 is downstream. Paired end reads, on the other hand, align on opposite strands.
SOLiD Mate Paired reads (see Figure A2.1, left) are usually 50 or 60 bp reads with F3 and R3 tags, respectively.
Alignment can be performed with PASS using this command:
pass -csfastq library1_F3.csfastq -d contigs.fna \
-p 11111100111111 -cpu 12 -fid 90 -uniq -gff > lib1F3.gff
The -uniq switch prints only unique alignments, and it’s recommended because ScaMPI will use only those kind of aligned reads. It is not mandatory, though, so if you performed alignments for other purposes, you can still use the GFF file produced.
Mate Paired reads with both mates aligned inside the same contig can be used as an indicator of mis-assemblies under the assumption that the physical coverage should be uniform in a properly assembled contig.
Figure A3.1 - Scheme depicting physical coverage.
A major limit of this approach is that only contigs larger than the average insert size of mate pairs can be verified. Moreover - especially with short insert size libraries - particularly complex regions could lead to a drop of physical coverage not connected with mis-assemblies (i.e. false positives are possible).
Nevertheless breaking apart contigs showing a drop of physical coverage can certainly benefits the whole scaffolding process.
First, to speedup the process, the UNIQUE_PAIR file produced by pass_pair (see Pairing alignments) has to be converted to a slimmer format and sorted with the pairin_simplifier.pl script, as shown below:
pairin_simplifier.pl -i UNIQUE_PAIR -gff -sort pairs.txt
The -gff parameter (requiring no arguments) specifies that the UNIQUE_PAIR is in GFF format, while default input is SAM.
By default the script would convert the file to STDOUT, in a tabular format that has to be sorted to be used by correctness checking module.
The -sort outputfile parameter will save output in a temporary file and at the end sort it (using UNIX sort command, that is thus required).
The output can be parsed with the correctness.pl script:
+--------------------------------------------------------------------+
| PHYSICAL COVERAGE ANALYSIS v. 2.00 CRIBI 2013 |
+--------------------------------------------------------------------+
-i file Unique Pair sorted (produced by pairin_simplifier.pl)
-o dir Output directory for tracks (default: current)
-t Print all tracks (contigname.track)
-bt Print tracks of broken contigs/sequence
-sam file SAM file to read header
-ref file Reference (no need to provide -sam)
-save file Print splitted contigs to file (requires -ref)
-cov int Minimum physical coverage of contigs to be printed
-len int Minimum length of contigs to be printed
A typical usage:
correctness.pl -i pairs.txt -ref contigs.fa -save new_contigs.fa -len 100
A graphical representation of each contig physical coverage can be created with the track2img.pl script (requires GD module). An example of output is show in the picture below.
Figure A3.1 - Physical coverage of a contig indicate a probable misassemby.
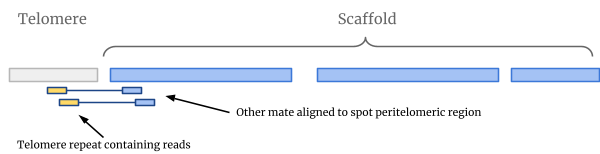
The “Telomeric Repeat Analysis Pipeline” (TRAP) has been developed to enhance scaffolding by identifying chromosomal ends. In the test case used for ScaMPI, the microalga N. gaditana, little was known about its genomic arrangement and discovering ~60 telomeres let to an estimate of 30 chromosomes. This number is quite important to understand the status of scaffolding and how to improve it.
A version of TRAP tightly integrated with the ScaMPI web interface is under development and will be released with ScaMPI v.2.0.
In the unfortunate case of unknown telomeric repeat, it has to be guessed using known repeats or discovered de novo. It might be the case that analysing longer reads (454, Torrent or even Illumina’s) we can identify unexpectedly over-represented motifs, and after discarding low complexity repeats (like, CTCTCTCT...) we can keep the remaining and test them.
For this step many programs can be used. We provide a simple script (trap_words.pl) that can be used for this purpose.
Usage:
trap_words.pl -i reads_file -w word_len -m min_read_len -filter \
> reads.fa 2> log.txt
This script will produce as output a set of reads with tandem repeats, and a “log” with a set of most frequently found motifs (note that the printed motif is the first version in alphabetical order so that TAACC becomes AACCT).
Last lines of “log” file from N. gaditana reads:
ACCTGC 79
ACACAT 81
ATATCT 90
AGCAGC 169
AACAGC 237
AGGTAT 259
AGGTGT 261
AGAGGT 267
AGGGGT 288
AACCCT 393
AGGGTT 930 # this TTAGGG is the telomeric tandem repeat
First we should convert the two MP files into a single file for faster search with the trap_preparereads.pl program used as follows:
trap_preparereads.pl file_F3.csfastq file_R3.csfastq > file.mp1
The output is a tabular file with this structure (suggest:
Mate_name F3_seq F3_qual R3_seq R3_qual
This can easily parsed and used to reconstruct paired reads in FASTQ format using the trap_PatternSelector.pl script as described below:
trap_PatternSelector.pl file.mp1 pattern -single
The pattern has to be in color space, for example 03200 instead of TTAGGG. The program will save two output files adding to the input file name the .F3 and .R3 suffixes by default. Using the -single switch causes the whole dataset (F3 and R3) to be printed in the same file (.F3).
PASS with default parameters can be used to align reads against contigs and/or scaffolds.
pass -csfastq selected_reads.F3 -d contigs.fna -gff -cpu 12 > aln.gff
It’s important to specify the -gff switch, as downstream analysis is based on this format.
A simple scripts evaluates the density of alignments. It’s called trap_gff.pl and its arguments are: the alignment file in GFF format, the reference, the window and the enrichment of alignments requested to mark a region as putative telomere.
trap_gff.pl newscaf.gff test.scaffolds.fna 400 10 > telomericregions.txt
The output is a tabular file with these fields
Ref_name Position(window) N_aln_for N_aln_rev Flag Enrichment
Where the position refers to a windows as specified to the program and “flag” can be “T” for telomere or blank, and it’s T when the enrichment of alignments in the windows is greater than the threshold specified in the parameters. An example for a single scaffold is shown below:
# ------ Seq:00534 (93880 bp, 12458 alignments)
00534 0 60 119 1.3X
00534 1000 1724 2954 T 35.3X
00534 2000 2167 3305 T 41.2X
00534 3000 413 896 T 9.9X
00534 4000 119 201 2.4X
00534 5000 30 11 0.3X
00534 6000 7 4 0.1X
00534 7000 5 3 0.1X
00534 8000 16 12 0.2X
00534 9000 7 6 0.1X
00534 10000 1 4 0.0X
00534 11000 6 3 0.1X
00534 12000 4 5 0.1X
00534 13000 3 2 0.0X
...cut...
00534 77000 0 0 0.0X
00534 78000 1 5 0.0X
00534 79000 2 2 0.0X
00534 80000 3 0 0.0X
00534 81000 3 3 0.0X
00534 82000 0 0 0.0X
00534 83000 5 6 0.1X
00534 84000 2 4 0.0X
00534 85000 3 1 0.0X
00534 86000 11 5 0.1X
00534 87000 1 3 0.0X
00534 88000 1 3 0.0X
00534 89000 2 3 0.0X
00534 90000 1 2 0.0X
00534 91000 2 0 0.0X
00534 92000 1 3 0.0X
00534 93000 1 3 0.0X
You can see that there is a telomere at the begin (5’) of the scaffold, while there is none at the end. The background noise is generally very low. After inspecting the file you can run the extract_telomeres.pl script that find peaks and report telomeres when present at the begin (5’), end (3’) or non-canonical position (can be used to spot misassemblies).
Update: the new version (v. 1.1) of the script will print a more informative output:
# ------ Seq:chr19 (59063183 bp, 126 alignments)
chr19 0 0.00% 52 T 0.8X
chr19 10000 0.02% 0 0.0X
chr19 20000 0.03% 0 0.0X
chr19 30000 0.05% 0 0.0X
chr19 40000 0.07% 0 0.0X
...
chr19 59020000 99.93% 0 0.0X
chr19 59030000 99.94% 17 0.3X
chr19 59040000 99.96% 3 0.0X
chr19 59050000 99.98% 50 T 0.8X
chr19 59060000 99.99% 0 0.0X
While comment lines starting with a sharp still exist, they are no longer necessary as the reference name is reported in column 1.
Column 2 still keeps the position of the windows, but now column 3 reports the position as a percentage to make it easier to retrieve extremities.
Column 4 reports alignment (For + Rev, while former output reported the two separately).
Plug-ins are supplied as an archive to be extracted within the /web/inc/plugins directory of ScaMPI. Each plugins has a _pluginname.php file and (at least) a pluginname.php file, the former being a shortcut for the top bar menu, the latter being the plugin per se.
Plugins can be displayed singularly or grouped, and this settings is stored in the _pluginname.php file.
Default plugins supplied with scampi are:
This plugins takes a snapshot of the whole database, printing the output to the browser or into a file. Default output directory is /tmp/ being writeable by (most) web servers, but can be changed. The intended use is to move/copy the db file into an appropriate location/device.
Requirements / Preliminary steps:
Once that these steps are completed, accessing the “BLAST” plugin will show you a form where to paste the sequence you want to BLAST and some options.
Note that putting more databases in the blast directory will enable you choosing the reference, having contigs.fa as the default (and required) one.
Just click it from the home page to produce a whole genome scaffolding file in AGP format. If clicked from a contig, will produce the AGP only for its scaffold.
There are other plug-ins in our website that can be installed.
ORF Finder
Primer Picking
Contigs have to be produced in FASTA format. ScaMPI requires to know the coverage of each contig, and because most assemblers store information about each contig in its header line, a program that parses the FASTA file is provided to extract sequence, its length and the coverage from the contigs file to populate a MySQL table (called ‘contigs’) having this structure:
CREATE TABLE contigs (
id INT AUTO_INCREMENT PRIMARY KEY,
name VARCHAR(255), --contig name as present in the FASTA file
len INT, --contig size as calculated from FASTA file
cov FLOAT, --contig coverage as extracted from FASTA
scaffold VARCHAR(200), --scaffold name the contigs belongs to
sid INT, --position in the scaffold (1=First...)
dir CHAR(1), --orientation in the scaffold (U or C)
notes TEXT, --user supplied notes,
t3 BOOL, --flanks a telomer3 at 3’
t5 BOOL, --flanks a telomere at 5’
exclude BOOL --exclude from scaffolding
);
Reads are expected to be in FASTQ format, to be aligned against contigs using PASS (binary supplied or source available at http://pass.cribi.unipd.it/). PASS supports various output format, but the preferred for ScaMPI is the GFF. A script to convert SAM to GFF is supplied in the package.
The two files (first and second mate/pair) are expected to be aligned independently, and then paired with the “PASS PAIR” program that classify pairs in categories (requires to know the library type and the library insert size), the two being used by ScaMPI being:
UNIQUE_PAIR - If the two mates/pairs align uniquely within the same reference contig with the proper mutual orientation and distance
UNIQUE_PAIR_OUT - If the two mates/pairs align uniquely within two different contigs, and the distance from the extremities is still compatible with the insert size.
The two files are again in GFF format, having the alignment for the first mate followed by the alignment of the second mate.
For parsing convenience we provide a script to convert these files into a more compact and faster to read format, called “tabular reads file” structured as follows:
a1_contig a2_contig a1_start a2_start a1_end a2_end a1_strand a2_strand
Where a1 and a2 refers to the alignment of the first and second pair, respectively.
The arcs table is structured as follows:
CREATE TABLE arcs (
id INT AUTO_INCREMENT PRIMARY KEY,
lib INT, --library name
c1 VARCHAR(200), --contig1 name
c2 VARCHAR(200), --contig2 name
e1 INT, --end of contig1 facing contig2 (5 or 3)
e2 INT, --end of contig2 facing contig1 (5 or 3),
arcs INT, --number of alignments supporting this arc
sigma FLOAT --% of alignment supporting this orientation
);
The arcs table is populated by a script that parses UNIQUE_PAIR_OUT file and cluster connections between contigs, printing only those with a minimum number of alignments and minimum % of concordance (sigma) specified by the user.
To inspect the connection between contigs in a scaffold, ScaMPI can print a graphical representation of the whole scaffold, as shown in the picture below.
Figure A7.1 - Small portion of a scaffold picture. Each box represents a contig (not in scale), having both size and coverage labels. Arrows represent “arcs”. It is possible to find possible critical regions where, for example, only a connection support the link (of course this is normal if the contigs are larger than average insert size).
The ScaMPI suite produces a script in “dot” language (http://www.graphviz.org/doc/info/lang.html) that can be converted to a picture by “GraphViz”. Please refer to “dot” manual to convert the dot script to a PDF document or bitmap image. An example of usage is:
dot -Tpng scaffold_0123.dot > scaffold_0123.png
To convert all .dot file to image it’s simple to perform a loop in BASH as follows:
for i in *.dot; do dot -Tpng $i > ${i/dot/png/}; done
http://genomics.cribi.unipd.it/scampi/
Page of